Showing posts with label desserts. Show all posts

Thursday, March 20, 2014

Easy Blueberry Smoothie Bowl Dessert


This post really needs no words. Just look at the photos. This dessert is just that easy! 


So easy that I almost did not do this post at all... Just start with a smoothie recipe. 

Simple Blueberry Smoothie

1 cup Coconut Water
2 tbs Chia seeds 
2 tbs Hemp seeds
2 tbs Golden Flax Powder
1/2 tsp Ceylon Cinnamon
1/4 tsp Nutmeg
Handful of Pea sprouts
Large Handful greens (spinach or kale)
1-2 Bananas
1 Pear
1 cup frozen Blueberries
Optional:
You could also add raspberries and blackberries.
Or half an avocado (for extra creaminess).

Blend ingredients in a high speed blender. Smoothie done. You can find my other smoothie recipes here.


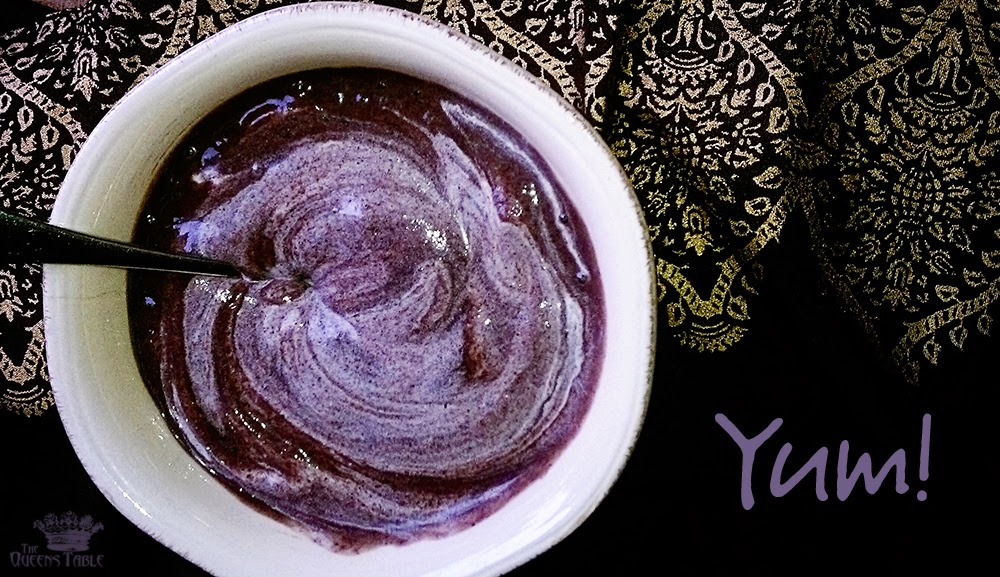
You can use any smoothie recipe really, the trick is not to drink it from a tall glass. Perhaps some people have not thought of changing up their smoothie by switching to a bowl, and turning this healthy sweetness into a real dessert experience! I did this post for you! Now grab a couple of bowls and a big spoon! 


Add homemade whipped cream, or a non-GMO mostly organic whipped topping. Stir. 


The swirls are so pretty and colorful. Love them! Top with blueberries, nuts, more whipped topping, or granola. Eat this dessert instead of ice cream and be really, really, good to yourself. The kids are going to love it too! Heaven... since it's totally divine, easy, and looks so fancy too. So there you go...a simple idea that is simply delicious! Be happy. Be healthy. Be peace.


Sunday, December 22, 2013

Date Nut Balls! Easy Treats For Last Minute Holiday Sweets And Parties!


It's party season for the next week or two! Here is a simple recipe loaded with delectable sweetness. Bite sized treats looking like baby snow balls, they're perfect for any winter get together! Do you see my edible fruit/veggie tree sitting on the buffet table behind the snowy date nut ball pyramid in the photo above? You can find that very popular colorful edible tree post here along with simple instructions. Both of these dessert recipes are fun to make, and to eat! Mmmm I can't wait!!! Let's do this nut ball thing!

The kitchen equipment required to mix the date nut ball mixture is a food processor, or a high speed blender, as a regular blender will not handle the gooey sticky dates. Remember to soak your nuts of choice the night before you make these date nut balls, and you are ready to begin. If you do forget, then soak the nuts six hours before you make this easy yummy dessert. I did not soak the cashews, as they do not respond well to soaking.  

You can use any other soaked nuts you prefer, and if you use only two kinds of nuts that is fine too. For example you could use walnuts and macadamia nuts if that is what you have in your pantry. As long as you use 3 parts nuts/seeds to 2 parts dates, your mix will turn out okay. Everyone loved the combination I put together for the date nut balls in my recipe below. You know I had to add superfoods to this raw vegan dessert. These date nut balls will look just beautiful on your holiday buffet table!


Easy Date Nut Balls

3oz Hazelnuts
3oz Cashews
6oz Almonds
6oz Walnuts
1 oz pumpkin or sunflower seeds
1 TB Hemp seeds
2 TB ground flax seed
2 cups Medjool dates that have been soaked 30 minutes
Coconut flakes
1/2 tsp Vanilla
1/2 tsp Cinnamon

Rinse your pre-soaked nuts and drain off the water. Remember I did not soak the cashews. Carefully pit your dates! You don't want to throw away the entire mixture because you missed one! Place your pitted dates into a bowl and just cover the dates with spring water. Let dates sit in bowl for 30 minutes while you get the nut and seed mixture together. Get out your food processor or Vita Mix blender, and gather all of your ingredients together. Add the nuts, seeds, cinnamon, and vanilla into the food processor. I used the S blade. You could add 2 TB of the coconut flakes in with the nuts and seeds if you like, although this is optional.


Then add 1/2 of your soaked and carefully pitted dates. Pulse all into a medium grainy texture. At this point add the remainder of the dates to the food processor. I also added about 2 TBS of the sweet water liquid from the date bowl into the food processor. If your mixture gums up around the blade, stop the machine and move the mix around. Pulse till medium grain again. Any ingredients can be adjusted to create the right texture. Transfer from food processor into a bowl and mix well. 


Form into small balls and roll in coconut flakes to coat the outside. You can see from the photo we made half of the balls small, and half of the date nut balls larger. Three small balls are about 100 calories, so don't over eat these very sweet treats! You can store them covered in the fridge for up to two weeks. Honestly these wont last longer than a few days! Enjoy! Everyone else will!


It just would not be a complete holiday date nut ball recipe without sharing one of our favorite seasonal traditions... watching the classic 'Delicious Dish Schweddy Balls' video. Slip on into your crazy Christmas sweater and giggle along with this funny skit while it is still available online. How Alec and the girls remain serious while delivering these lines is a mystery! Click on the link right now to view, as it's not always easy to find. You will be LOL to this old SNL!


Don't rely on Pete! Get yourself a festive sack! Date nut balls are great for holiday food gifts! Super easy to make! Good times!!! And wayyyyy better than rice and tap water for Santa. Our food lifestyle does not wreak havoc on the digestive system 'cause we be eatin' good in the neighborhood! Season's Eatings to All! And to all a good night!


Wednesday, September 18, 2013

Banana Ice Cream: A Simple Healthier One Ingredient Dessert Alternative


Doesn't that look scrumptious?!!! We still get to have sundaes while eating healthy! How cool is that? As cool as these bananas baby!  One ingredient ice cream! No dairy! No fat! No mystery chemicals! No added sugar. Natural sweetness is better. Just use frozen banana and your choice of toppings for your ice cream sundae! Perhaps you will add fresh fruit, berries, nuts, organic chocolate sauce, honey, maple syrup, or balsamic reduction glaze for your toppings. You make the call. The once a week banana sundae treat Rocks!


Most of us have bananas around for our green smoothies anyway. So when the bananas start going too dark and soft it's time to slice and dice. Be sure to peel the banana first! I confess the first time I did this last year I actually left the peel on! You cannot get it off when it is frozen! Too funny! Such a dork!

Get in the habit of having frozen banana slices ready to put in your smoothies, or to make ice cream anytime! When bananas start to get over ripe they are at their sweetest. That is the perfect time to add them to your banana bag in the freezer. The next day your bananas are ready to use. When organic bananas go on special at the store take advantage, and stock up for your freezer supply! Since bananas have a thick peel you could buy conventional to save money. They are #35 on the EWG pesticides produce list. We prefer to buy organic and avoid the nastiness of the chemical companies.

Conventional strawberries are number two (#2) on the dirty dozen list. We topped our dessert with organic blueberries. Did you know that domestic conventional blueberries (#13) have more pesticides than imported conventional blueberries (#22)? I recommend that you buy organic and avoid the dozens of pesticides each fruit has anyway. The truth is yukky.


Back to our dreamy ice cream sundae... We just grab some of those frozen banana chunks and go for it! You can also let the frozen banana pieces sit a few minutes and then mash with a fork and stir into a chunky creamy consistency. Other people like to blend their frozen bananas into a soft serve ice cream. I am lazy and do not want to be cleaning up a blender, when I can immediately be eating a sundae! Cravings are like that! So you do what turns you on! Dripping organic chocolate sauce still works for me! Yeah! Plus walnuts! Got to have me some crunchy walnuts. Who doesn't like a sundae you can feel great about?!!! Enjoy the decadence!


Monday, July 8, 2013

Chocolate Avocado Pudding: WoW! What A Decadent Vegan Mousse!


My daughter made this yummy chocolate avocado pudding, and I just had to share her recipe with you!  So creamy, so delish! I know... it seems hard to imagine how these two flavors go together. The magic is that they do! Oh my! Plus, look how simple this tasty pudding is to create! You can do this! Healthy super desserts! What's not to love! It's chocolate for goodness sake! Ahhhhhhhhhhhhhhhhhhhhhh! Must go in the tummy now!

Chocolate/Avocado Pudding

1 Large Florida avocado, or 2 California avocados
1/4 Cup Organic Dark Chocolate powder (+/- to taste)
1/4 Cup Maple syrup (+/- to taste)
Pinch of salt
1/2 tsp real Vanilla extract
1/4 cup coconut milk

Place all ingredients, except coconut milk in blender, and combine. The coconut milk is added to thin it out enough, to reach a pudding consistency. Add some of the coconut milk, and blend again. Check consistency, and taste. Add more milk and or sweetener as needed. This dessert holds up well covered in the refrigerator for the next evening's dessert! Very different than other recipes involving avocados! ... ENJOY! 


Friday, May 24, 2013

Blackberry Cucumber Pear Smoothie


Time to start your latest super adventure with this fabulous smoothie featuring an English cucumber and dark delicious blackberries. Throw in a handful of nutritious fresh pea sprouts for your greens. Instead of the usual banana, go grab a juicy pear. So simple. So yummy! Great for breakfast or a divine dessert! Mix the following ingredients together in your favorite blender. Live the rainbow and have a colorful day!

Blackberry Cucumber Pear Smoothie

Coconut water
2 tbs chia
 2 tbs Fresh ground golden flax powder
2 tbs hemp seeds
1 tsp sesame seeds
handful pea sprouts
1 English cucumber peeled
1 pear
1 cup blackberries
1/2 tsp turmeric
1/2 tsp Ceylon cinnamon


Digital Collage Artwork: Crystal Visions Art, Elements: Tumblefish Studio, 
Lorie Davidson, Hidden Vintage Studio, and Public Domain

Wednesday, April 24, 2013

What's That? Dragon Fruit


This exotic Pitaya fruit which is grown in South America and many Asian countries is definitely the most gorgeous fruit I have ever seen for sale at our local grocery store. My eye always goes straight to this glowing beauty. A member of the night blooming cactus family, this shocking hot pink fruit always stands out when sitting in the fruit bins at Wegmans. Although the insides of Dragon Fruit can come in magenta, and yellow as well, I think the crisp white color dotted with the tiny black specs of the Dragon Fruit seeds are visually impressive against the pink outer rim. What a fantastic display, and lovely presentation a few of these Dragon Fruits would make on your party buffet table! Imagine a couple of these halved and sitting around the edible fruit tree (click for my previous post). Wow! Talk about turning people on to eating more fruit! Once people taste how delicious these cubes of fruit are, it will disappear from the table in no time. There are no thorns on this cactus either! Be prepared to fall in love with Dragon Fruit!


Nutritionally Dragon Fruit like most fruit contains valuable fiber to help with your digestion. Vitamin C, B1, B2, B3, Vitamin, A, calcium, phosphorous, are also readily available in the Dragon Fruit flesh. Since you eat the seeds that are evenly scattered in the flesh you are also getting protein and healthy fats. Additionally lycopene is in the red flesh variety of this cactus fruit. The delightful delish Dragon Fruit is also high in antioxidants making it a fighter of free radicals in cancer defense. Dragon Fruit is said to be a great choice for diabetics as it can aid in lowering the insulin response. Are you ready to try a Dragon Fruit yourself? You can read here how to choose a Dragon Fruit at the store. Dragon Fruit can be added to your smoothies and juices, with some coconut water and banana. Unless you have access to many of these tempting fruits, to me the Dragon Fruit seems too beautiful to just mush up in a drink. I like to take advantage of this showy species and enjoy the splendid attractiveness and tantalize the eye as well as the taste buds!


Preparing a Dragon Fruit to eat is very simple. You could just slice into long quarters and eat the interior flesh as you would an orange or watermelon, but I prefer the method of creating cubes shown above. After all with such a unique built in bowl, why not make use of that colorful attractive fruit platter. Oh I just love being fancy when it is so simple!


Slice open the fruit lengthwise with a knife revealing the delicious inner flesh. 


Carefully scoop with a large spoon a semicircular chunk of the soft interior flesh 
from out of the thick leathery skin. Much like half of a big melon ball.


Flip out the speckled flesh onto a cutting board and slice into cube shapes. 


Trim off any of the pink inedible outer skin that you may have cut by mistake. 


Return the cubes to The Dragon fruit bowls. Impressive! 
Use a fork or toothpicks to eat. You can cover and refrigerate.


Mmmm a delicate watery mouthwatering mix of soft sweet pear, melon, and kiwi in taste.
Plus hearing the word "Dragon" reminds me of "Game Of Thrones." Awesome! 
What a spectacular and cool dish this would be for a "Game Of Thrones" viewing party! 
Enjoy and Rock The Dragon!


Friday, April 5, 2013

Make Your Own Balsamic Vinegar Reduction Sauce For Sweet Potato Heaven


This is bliss! Oh yes! Sweet potato along with the divine taste of a balsamic vinegar reduction sauce! We are transported! I cannot think of a better dessert to have with dinner! Yes you can create restaurant style balsamic vinegar reduction in your own kitchen, and then have it on hand to use for future meals. All you need along with the main ingredient is time and patience. If you have those, then you and balsamic vinegar have a date for heaven! You won't believe how easy and delicious this sauce will be! Mmmmmmmm

Balsamic Vinegar Reduction Sauce

To start you will need a very good balsamic vinegar to work your culinary magic. 
For every cup of balsamic vinegar, you will make 1/4 cup of reduction sauce.

Bring 1 cup good balsamic vinegar to a boil in a stainless steel or enamel pan only, then reduce to a simmer. Here is the time and patience part: You will simmer the vinegar for 30 - 45 minutes on low, stirring constantly. Think of your arm as belonging to the Jetson's robot maid Rosie. Keep stirring. Stirring...


Most warn to be careful not to burn your reduction during the last minutes, and that you should stop when it gets to the consistency of honey. I did not even wait that long. I stopped when it really started to glaze the pan as I tilted the pot. Pouring the reduction into a tiny pyrex glass bowl, I then let it thicken upon standing. You are done! If your sauce sits in the pan to cool it will get too sticky to remove easily.


Now you can drizzle, drizzle, drizzle... on sweet potatoes, salad, tomatoes, strawberries, salmon, Asian foods, cooked mushrooms, pasture raised and weed finished meats, and even ice cream! Remember a little goes along way in flavor! Everyone will think you are so fancy! Just like a Queen!


You can use this as a dipping sauce too. Herbs such as Rosemary can be added as a flavoring. Seal your container and place in the refrigerator for storage. Sauce will last forever, or at least a year! Really, with this one, you will be lucky if it lasts two weeks before you use it all up! Yum!


No Oil Sweet Potato Fries

Place your pieces of sweet potato on parchment paper so the sugars released during cooking do not burn and stick to your bake wear. Bake at 400 - 450 degrees for 20 minutes. Turn at 10 minutes. Finish off by placing under the broiler for a few minutes and turning. Careful not to burn your fries. Serve with balsamic vinegar reduction drizzle.


You will love the Divine Drizzil-Liciousness!


Thursday, December 13, 2012

Holiday Party Edible Fruit Christmas Tree


This post has turned out to be one of my most popular 'Queens Table' blog posts! So I can assure you that this gorgeous colorful fruit tree is sure to be a hit at your next holiday gathering! Everybody is going to be impressed! I have now added new photos with how to transport your tree in a car too. Go ahead and create this beauty for your holiday party, or any time of the year that you want to make a big statement with good food! I originally got the idea from Fully Raw Kristina in the video below. 

You just have to purchase a wide variety of produce that is also very interchangeable in your own personal design for the tree. Be sure most of it is organic!

You will need: 1 pineapple, 1 pear, strawberries, blackberries, grapes, raspberries or cherries, kiwis, starfruit, cucumber, cherry tomatoes, and sweet peppers sliced lengthwise. Plus a box of toothpicks and a strong plate.

This treat is perfect for your holiday table and your happy belly! It's so great to find new inspiration to help us change our old patterns of eating. As we know the holidays can be such difficult times for people to make the best choices. Especially when food is so associated with time honored memories. For our own good health, and that of our family and friends, we now must have alternatives to the empty calories of the holidays past. This fruit tree idea would be a treat everyone could enjoy! Plus it looks fabulous! 


I learned something new by watching this video, and I just love learning new information that I can use! It's that you can eat the skin of kiwis! I did not know that! Still... I would only eat the skin if it was an organic kiwi after washing it well. Don't want to be ingesting any pesticides. Talking about healthy skin... just look how beautiful Kristina's skin is... that is the fully raw glow. Amazing. You could also watch the video that follows this one to learn what Kristina eats everyday to look so beautiful and full of energy. You may be surprised that such a tiny gal can eat so much produce!

Instead of the pineapple star that Kristina creates for her holiday tree, you could get a starfruit and slice that for the star on top of the tree. Then place the other slices on the plate around your fruit tree creation. I hope you enjoy watching how to make a beautiful holiday centerpiece that is super healthy too!

I have made this edible holiday tree centerpiece for our Christmas Day Buffet table. Look how fat my cherry tomatoes were! This tasty tree really was beautiful, and was quite the hit with everyone! I highly recommend making this yummy creation for yourself, or to take to a party! I also sat a small dish next to the tree for the guests to put the toothpicks in after grabbing a bite of fruit. As you can see, I did use the starfruit on mine, and it looked perfect.


When my three and half year old granddaughter came into the house, instead of looking for the gift tree in the living room, or running up to her playroom, she jumped up on a chair and marveled at Grandma's fruit tree on the table. "Oh, look Grandma has a little tree!" she exclaimed leaning across the table pointing at the centerpiece. So cool.


She was so excited to learn that she was allowed to pick from the tree, that she reached out and took a big juicy cherry tomato for herself! Now after seeing and enjoying this tree, other people request that I make this colorful edible fruit tree for their events, gatherings, and holiday parties too! The photo below is from a large family Thanksgiving at an old fishing cabin where everyone brings a dish.


My granddaughter was in attendance and even a year later you can see that she is right there ready to pick the fruit from the tree again! Gotta love that!


To transport your fantastic fruit tower in a car, just line a large bucket with foil, and place the tree and plate inside. I actually use a five gallon bucket with a sturdy handle and cover. To remove: lift the plate upwards while a friend pulls the bucket away. Your tree has arrived safely and intact!


By the way... I have to say that bringing your food to a party in a bucket 
is quite the conversation starter too!


Enjoy the wonderful holiday moments, and eat something good for you! 
Be happy. Be healthy. Be peace.


Friday, July 27, 2012

Berry Green Dandelion Super Smoothie!


During hot summer weather, a morning smoothie is a fantastic way to start your day! Thick, rich, and oh so delicious, this smoothie is loaded with goodness! And you might just want to eat it with a spoon! Thinking you must be having dessert, you will not even realize the nutrients you are getting! I can dig it! Filled with hemp seeds, chia, flax, and dandelion greens...all super foods. Hey! The rest of the ingredients are not too shabby either! Healthy and like dessert? That's just crazy! Try it for yourself!

Dandelion Berry Green Smoothie
4 large dandelion greens
3 Romain leaves large
6 oz coconut water
2 tsp flax powder 
2 tsp chia seeds 
2 tsp hemp seeds 
2 Bananas
6 frozen strawberries
handful of fresh blueberries
Michele's Cherry Chocolate Granola

Tear off the leafy part of your dandelion greens and drop into a good blender. Tear up Romain lettuce and add to the blender along with the coconut water. Blend and pulse till liquid. (I have been so happy to find out that my 25 plus year old Osterizer Blend-Matic 12 blender can handle greens! Obviously a product made before planned obsolescence.) 

Now add the chia, flax, and the hemp seeds. Let chia soak a bit, while you peel the bananas. (Some people place their peeled bananas in the freezer, before they make the smoothie to get them cold or frozen.) Time to add your berries, then pulse and blend. 

Pour and Serve! Adding some Michele's Cherry Chocolate Granola is optional, but this will add a nice crunch and breakfast feel to your smoothie. Yum! I hope you try this combination while blueberries are in season! Oh, and you do not taste the greens at all. So no worries newbies, this is a winner in the super taste department too!


Wednesday, May 23, 2012

"The White Rabbit" A Dessert Juice With Jicama, Apples, Pear, And Coconut


This is sooooo yummy! Dessert in a glass! I have been working on this amazing beautiful healthy dessert juice I call "The White Rabbit " for awhile, as I kept trying to keep the ingredients white without turning green. I learned celery, and cucumber even when peeled, still make a light green juice color. Finally I am satisfied with my elixir of the gods, "The White Rabbit!' With the added light organic coconut milk it does have a slight pina colada flavor without the pineapple. It is naturally very sweet, so diabetics should have this treat early in the day, and perhaps also add some peeled 'sun-choke' into the juicer if you have some. My batch made enough for 3 full wine glasses, so when it came time for a refill of the hubby's glass, he jumped from the table to get some! I think you will love it too! It would be great to serve for special occasions, or to friends who never heard of juicing! Let me know if you try this one!

The White Rabbit

2 Granny Smith Apples peeled and cored
1 Bosc Pear peeled and cored
1/2 lemon peeled
1 inch of fresh ginger peeled
1/3 of a large jicama peeled
2oz of light organic coconut milk

Prepare your fresh organic ingredients by peeling and coring. Add to your juicer all except the light organic coconut milk. When you are done juicing your items add the light organic coconut milk to your juice container and stir. Pour and enjoy! So delish a dessert that you'll be licking your lips! Note: Natures sizes usually vary, my batch when completed made just over 2 measuring cups. I had quite a large jicama, if your jicama is smaller or just regular size you might put 1/2 of it peeled in the mix. You can add a tad more coconut milk if needed too. An excuse for a little taste testing! Yum!